To pick up a rusty piece of junk, of which you’d utilise only the frame, fork and stem would definitely qualify as a labour of love.
Especially, if it would include the mother of all restoring obstacles: The Stuck Seatpost.
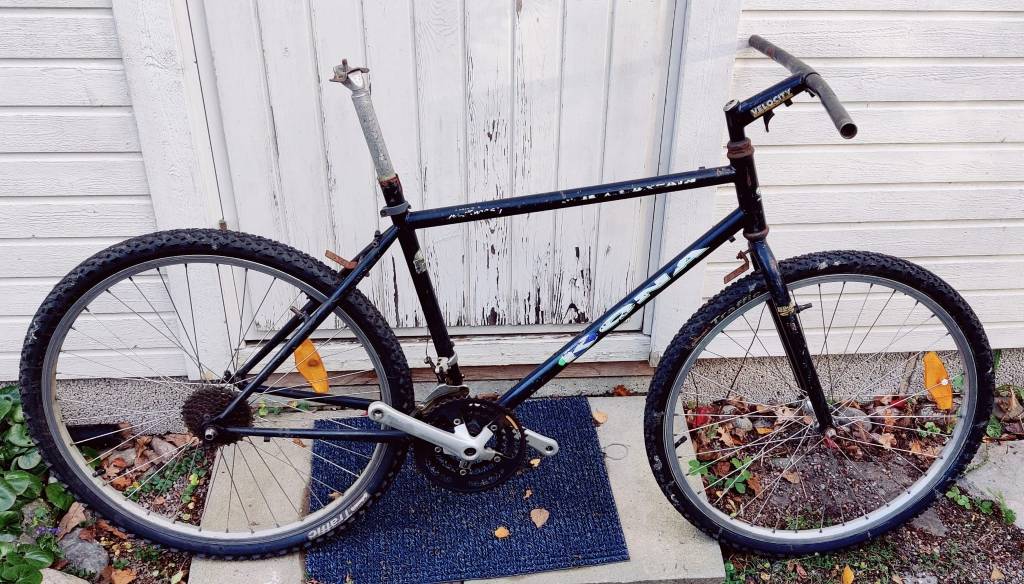
I came across this Kona Fire Mountain from 1992 that had components that were mostly rusty junk. It was on sale for a while and obviously appealed only to the connoisseurs, the brave ones.
So, I bought it. What else?

After stripping down some of the parts one gets an idea of the bike. The geometry has always appealed to me in Konas and that applies to lower-spec models too. The tubing is nothing spectacular at this level, but it will do.
When it came to components, there was really nothing worth salvaging. The headset was rusty junk and the bottom bracket did turn, but was not worth putting back on once the rebuild took place. Interestingly, the biggest chainring was a massive 48 tooth one on those Shimano 300 LX cranks.
Failed attempts
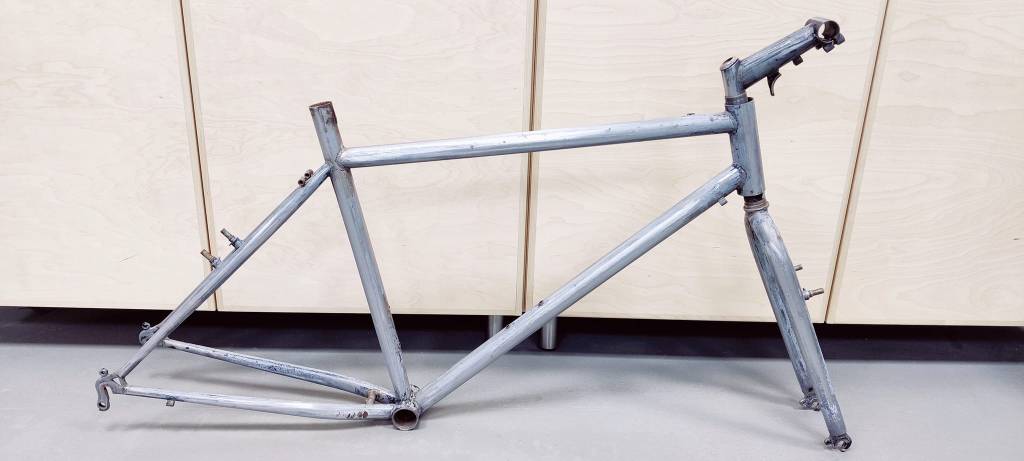
The previous owner had apparently tried to remove the stuck seatpost without success. Hence, the top of the seat tube was flared. Once an alloy seatpost gets stuck in an steel frame it is well stuck.
The rust of the steel tubing and the oxidation of the alloy seatpost forms such a glue that no amount of torque helps.
I did go through all levels of seatpost removal: denial, anger, bargaining, depression and acceptance.
I tried rust remover and any other chemical at hand and applied all levels of force at my disposal. Not a budge.
I then cut the seatpost short and applied a hacksaw to make grooves inside the seatpost and tried “imploding” the seatpost by crumbling the bits inside, but no success.
It can’t hold if it’s liquid?
Eventually I resorted to the ultimate solution: Dissolving the seatpost with caustic soda, or Sodium hydroxide by it’s scientific name.
Some people use drain cleaner which is basically the same thing and comes in various forms, but I opted for Biltema’s Caustic Soda.
It’s worth reminding that sodium hydroxide is highly corrosive and will cause chemical burns and must be dealt with care. I had the frame outside and the chemical reaction with aluminium creates fumes that are best avoided. I was also wearing protective gloves and eye-wear.
This was my first attempt to dissolving an alloy seatpost. It took me about a week. During remote working days, I added a mixture of water and caustic soda in to the seat tube/post and let it work its magic.
Once the bubbling stops you end up with some black goo that is basically the soda mixture with dissolved aluminium in it. I topped up the seatpost with fresh mixture repeatedly and let it dissolve overnight.
I highly recommend to grind as much material off the seatpost as possible, as the chemical mix has less material to dissolve. I made 4 grooves inside the seatpost with a hacksaw, but tried to avoid sawing the frame itself. However, this was futile and eventually, the remains of the seatpost came off when the thickness was that of a kitchen foil.
All in all, it took about 4-5 days to dissolve.
As a reminder: if you have an alloy seatpost stuck in an alloy frame: Don’t. The Sodium hydroxide will – naturally – eat into the alloy frame too.
Time for the strippers!
The dissoving process will have some spillage, so consider the paint job ruined to start with. Then it was time to remove the paint.
Paint strippers aren’t the same as they used to be – this is where one is supposed to blame the EU – and removing paint is a lot more ardurous as it used to be. The process in this case was that of paint stripper and mechanical abrasion.
Eventually, i got the frame to bare metal.
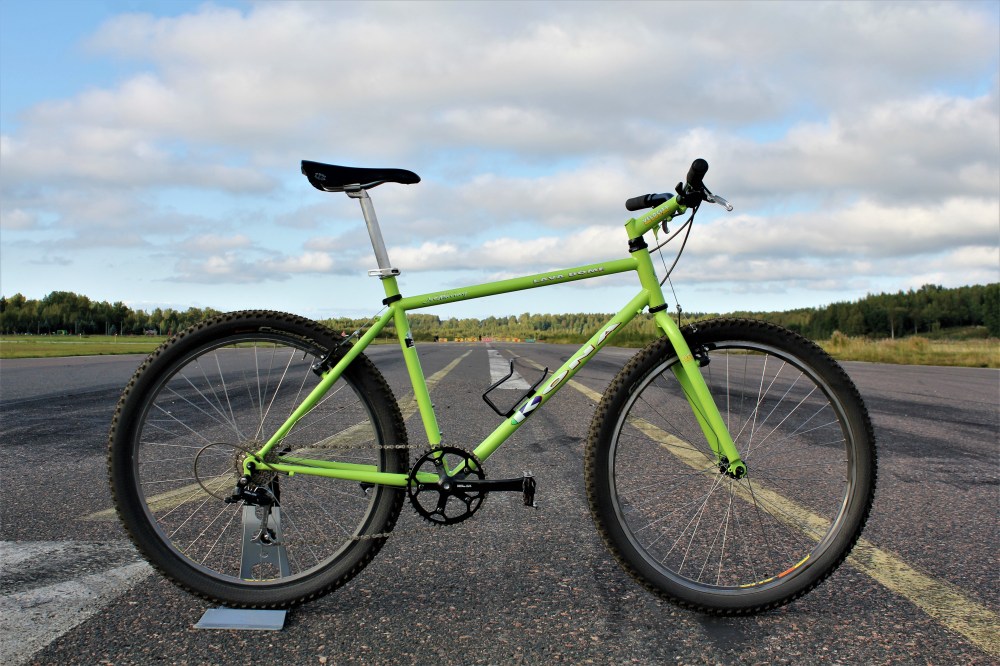
Go Green.
I had browsed RetroBike forum and there was a similar re-painted project in it’s optional colour: green. That green is a really nice, sort of a non-glossy pistachio green, but I knew that I wanted Kawasaki Green.
So, I dropped in at my local paintshop Car Paint Center Helsinki and explained that I was painting a bicycle frame and wanted it in Kawasaki Green. They sorted me out with the primer, the paint and the clear coat.
If you’re an absolute novice in painting like me: Go to the professionals and explain your project. They know, because they do that for living.
I got great advice, right products and even a nozzle better suited for painting a tube-like surface like a frame.
Eventually, the paint job was a bit of a botched job, but that was due to my amateurism. I had limited time, painted the frame in a confined space and I lacked skill.
Simple as that. I paid bananas and got monkeys. Me, that is.
Had this been an orthodox repaint, the stem and the fork should have been black, but I wanted to be flashy and painted them green too.
The devil is in the decals
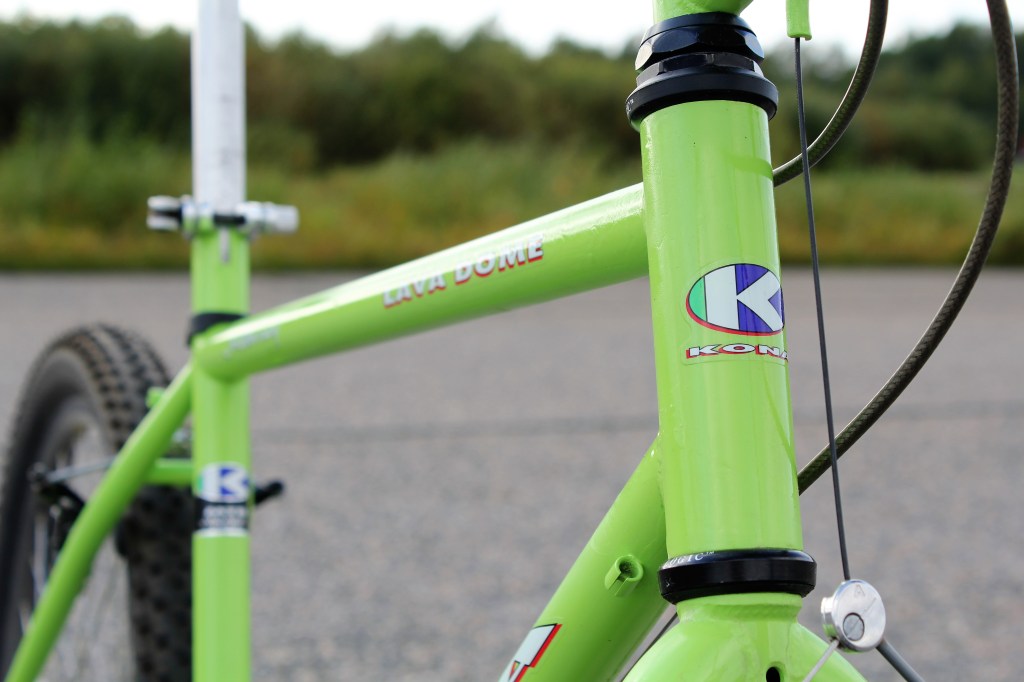
Now wait a minute, Fire Mountain… Lava Dome… what’s with the decals?
Indeed. I could not find 1992 Fire Mountain decals from eBay, nor did I want to commission ones without knowing how long it would take to get them done by some guy on the Internet.
There were only ones for 1993, but those would have been sacrilegious… I found the 1992 Lava Dome decals and they were more fitting to the bike.
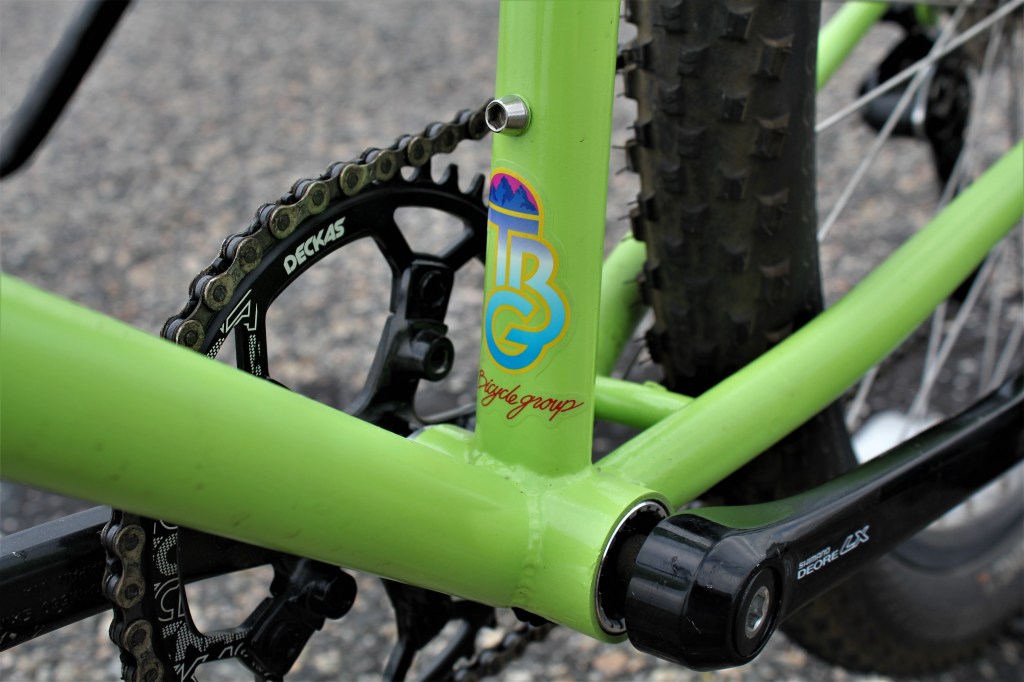
The 1992 decals have that K-logo in front and a beautiful TBG (The Bicycle Group) logo above the bottom bracket.
I painted the frame, applied the decals and then sprayed on the clear coat.

Time to choose components
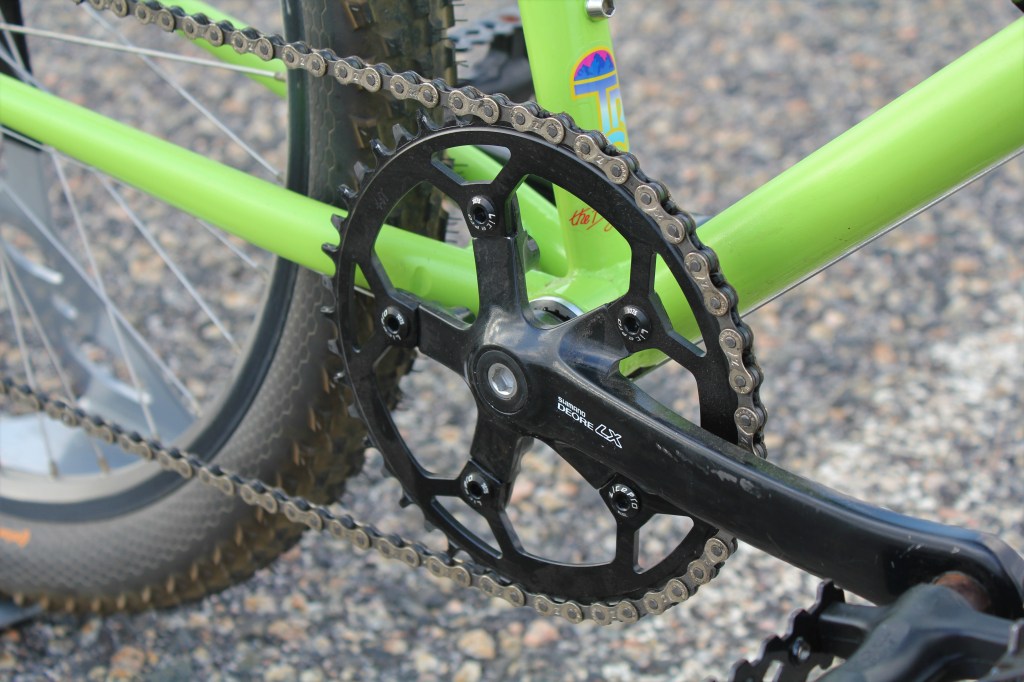
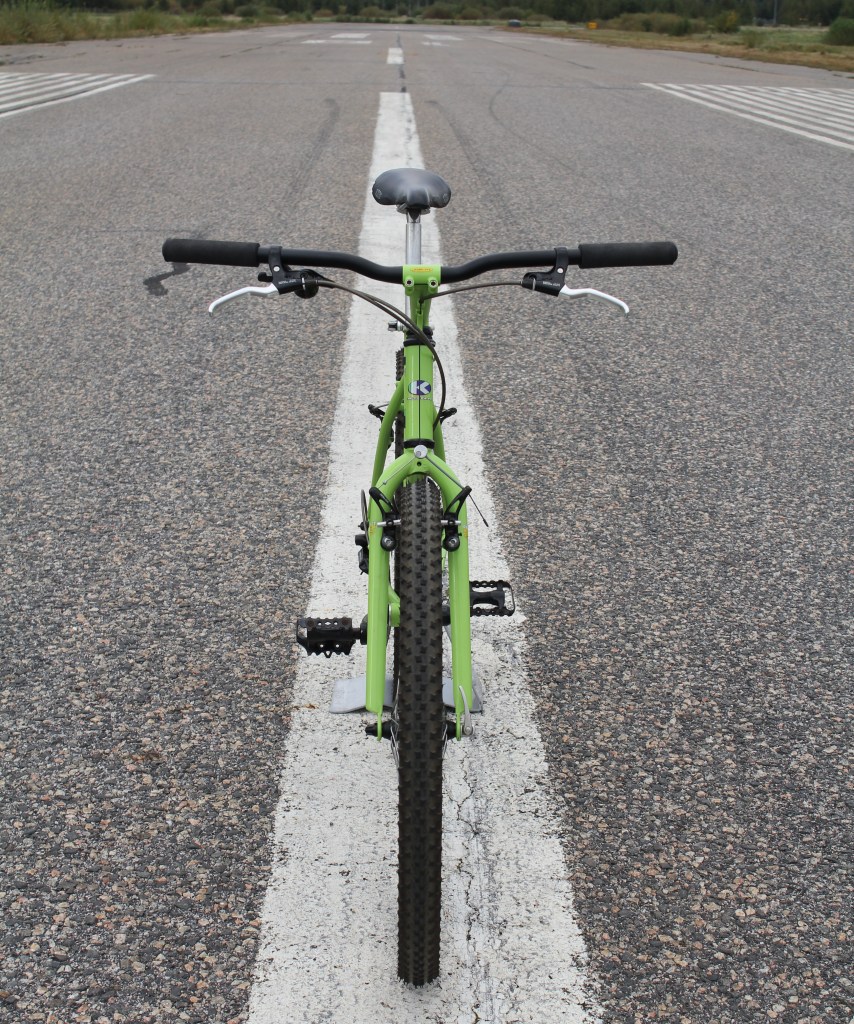
This bike was to be a simple, basic, no-fuss, no high-end affair. I had a “no front derailleur” idea in mind and that came to be.
I had some Shimano Deore LX M563 bits lying about and decided to build the bike around a green & black theme. It worked well.
I had a wheelset with some decent LX hubs on Mavic rims to start with. The shifters were 3×7, but the rear hub was actually an FH-M565 that fits 8-speed freehub and naturally everything up to 11-speed.
I had to add some spacers to fit a 7-speed cassette to an 8-speed freehub. And limit the rear derailleur to stay in line.
For the front I went for the Chinese Deckas 43T 110 BCD Narrow wide chainring. It’s always a bit of a hassle to line up the chain if one is overly bothered about the chain line, but I am not. It is a bit off, but it works.
The Deckas chainring has decals on the drive side, but I flipped the chainring around and now they are less visible on the left, the non drive side.
The brakes are standard cantilever BR-M560s with some Ritchey pads. The brake levers are also Deore LX M560 series and I removed the left/front shifter from the brake lever as it has no function on it.
At first, I had a proper straight and narrow 90s handlebar but then I succumbed to comfort and installed a wider, riser type of a handlebar.
1990s were great and all that, but the narrow and deep riding position of the times was not optimal, in hindsight.
Take-aways?
So, what did I learn with this project? Any dos and don’ts?
Apparently, not much since my mind and workshop is already cluttered with new projects, the ones too good to be missed…
Anyway, the list:
- If possible, do not paint the frame yourself, if you’re not skilled enough
- Nothing else.

One Comment Add yours